-
Mac OS 에서 Apache Nifi 사용해보기 #5 - 실습(날씨 데이터 수집)3Intelligent Product/Apache NiFi 2022. 10. 19. 10:17
지난번 포스트까지는 날씨 데이터를 가져와서 그대로 파일로 저장하는 플로우를 작성해보았다.
이번에는 데이터를 정제하여 RDB에 입력하는 프로세스를 작성해보려고 한다.
이번에 작성한 Flow는 아래와 같다.

InvokeHTTP : 기상청으로부터 데이터 요청한다.
EvaluateJsonPath: flowFile content에 있는 JSON 데이터를 확인하여 flowFile Attribute 로 저장한다.
ExecuteGroovyScript: groovy script를 실행시키며, 여기에 날씨데이터를 파싱하는 로직을 추가하여 데이터를 정제한다.
PutSQL: RDB에 데이터 적재한다.
1. InvokeHTTP
- Run Schedule : 0 15 2/3 ? * * * (2시부터 3시간 간격으로 15분에 실행한다.)
- HTTP Method: GET
- HTTP URL : http://apis.data.go.kr/1360000/VilageFcstInfoService_2.0/getVilageFcst?serviceKey=[ServiceKey]&pageNo=1&numOfRows=50&dataType=JSON&base_date=${now():format("yyyyMMdd")}&base_time=${now():format("HH")}00&nx=57&ny=126
2. EvaluateJsonPath
- InvokeHTTP 에서 가져온 데이터에서 response.body.items.item을 content attribute 에 저장한다.
{
    "response": {
        "header": {
            "resultCode": "00",
            "resultMsg": "NORMAL_SERVICE"
        },
        "body": {
            "dataType": "JSON",
            "items": {
                "item": [
                    {
                        "baseDate": "20221018",
                        "baseTime": "0800",
                        "category": "TMP",
                        "fcstDate": "20221018",
                        "fcstTime": "0900",
                        "fcstValue": "8",
                        "nx": 57,
                        "ny": 126
                    },
content에는 item 배열이 저장된다.
3. ExecuteGroovyScript

- Script Body 에 Groovy script를 입력하여 실행 할 수 있다.
import groovy.json.JsonBuilder
import groovy.json.JsonSlurper

def flowFile = session.get()
if(!flowFile) return

def newFlowFile = session.create();

slurper = new JsonSlurper()

def transferJson = [:]

def content = flowFile.getAttribute('content')
def items = new JsonSlurper().parseText(content)
def fcstTime = items[0].fcstTime.toString()
def fcstDate = items[0].fcstDate.toString()
def baseTime = items[0].baseTime.toString()
def baseDate = items[0].baseDate.toString()
def header = ['TMP', 'UUU', 'VVV', 'VEC', 'WSD', 'SKY', 'PTY', 'POP', 'WAV', 'PCP', 'REH', 'SNO', 'ANNC_DT', 'FCST_DT']

items.each{it ->
    if ((it.fcstTime == fcstTime) && (it.fcstDate == fcstDate) && header.contains(it.category)) {
        transferJson << [(it.category) : (it.fcstValue)]
    }
}

transferJson << [('ANNC_DT') : (baseDate+baseTime)]
transferJson << [('FCST_DT') : (fcstDate+fcstTime)]

def output = new JsonBuilder(transferJson).toPrettyString()

newFlowFile.putAttribute("transform", output)

header.each{ val->
    newFlowFile.putAttribute(val, transferJson[val])
}

newFlowFile.write("UTF-8", output);
log.info(output)

session.remove(flowFile);
REL_SUCCESS << newFlowFile
- 정제된 데이터 원본은 transform attribute에 저장하고 해당 내용들은 각 attribute로 만들어서 저장한다.
- 결과를 확인하면 다음과 같다.
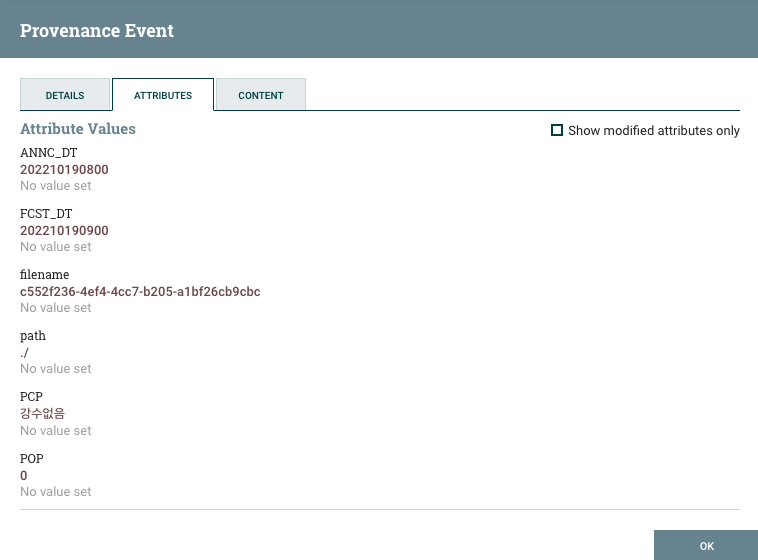
- 정제된 데이터는 다음과 같다.
{
    "TMP": "9",
    "UUU": "-0.1",
    "VVV": "-0.9",
    "VEC": "13",
    "WSD": "0.9",
    "SKY": "1",
    "PTY": "0",
    "POP": "0",
    "WAV": "0",
    "PCP": "\uac15\uc218\uc5c6\uc74c",
    "REH": "60",
    "SNO": "\uc801\uc124\uc5c6\uc74c",
    "ANNC_DT": "202210190800",
    "FCST_DT": "202210190900"
}
4. PutSQL

- DB 연결을 위해서는 JDBC Connection Pool(Controller Service) 을 만들어 줘야한다. 해당 항목 우측의 화살표를 누르면 설정 화면으로 이동할 수 있다.

- +를 누르면 새로 생성 가능하며 내용은 다음과 같이 설정하였다.
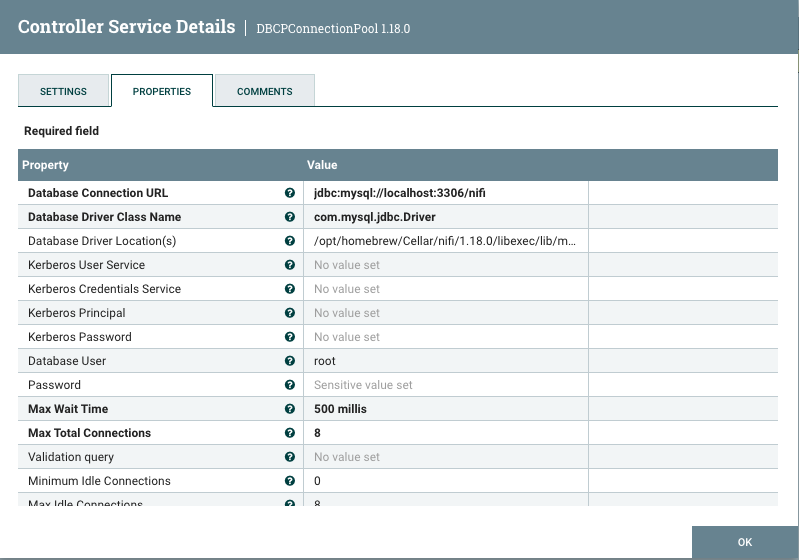
- NiFi 에는 JDBC 드라이버가 없기 때문에 MySQL 공식 홈페이지에서 드라이버를 다운받아서 설치하였다.
- 데이터 저장 쿼리
INSERT INTO nifi.weather_forecast (annc_dt, fcst_dt, pcp, pop, pty, reh, sky, sno, tmp, uuu, vvv, vec, wsd, wav, created_datetime, updated_by, updated_datetime) VALUES('${ANNC_DT}', '${FCST_DT}', '${PCP}', '${POP}', '${PTY}', '${REH}', '${SKY}', '${SNO}', '${TMP}', '${UUU}', '${VVV}', '${VEC}', '${WSD}', '${WAV}', CURRENT_TIMESTAMP, 0, CURRENT_TIMESTAMP);tip) ${attribute_name} 의 표현식을 이용하여 flowFile의 Attribute 를 사용할 수 있다.
* 결과

'Intelligent Product > Apache NiFi' 카테고리의 다른 글
Mac OS 에서 Apache Nifi 사용해보기 #7 - 실습(Custom Processor 분석) (0) 2022.10.24 Mac OS 에서 Apache Nifi 사용해보기 #6 - 실습(Custom Processor) (0) 2022.10.24 Mac OS 에서 Apache Nifi 사용해보기 #4 - 실습(날씨 데이터 수집)2 (0) 2022.10.13 Mac OS 에서 Apache Nifi 사용해보기 #3 - 실습(날씨 데이터 수집)1 (1) 2022.10.13 Mac OS 에서 Apache Nifi 사용해보기 #1 - NiFi 란? (0) 2022.10.12